Showing posts with label #iPhone5S. Show all posts

Sunday, April 27, 2014

iCloud basics

Those of us that have owned Apple devices for more than 3 years may or may not remember a service from Apple called MobileMe.  All you need to know about MobileMe is that it never really provided the functionality on the scale that Apple had hoped.  In 2011, Apple re-branded MobileMe to iCloud.  In the almost three years that it's been up and running, it's been a blessing to iOS users.  Offering a cloud service that syncs and backs up your content, and it works!

Why is having a cloud service important?  Simply put, every other major software/hardware vendor has one, and without it, you'd still be plugging your iPhone/iPad/iPod Touch into your Mac (or PC), and muddling through iTunes to sync and back up your content.  That is so early 2000's!  Today it's ease of use we all desire (or demand).  I can tell you, I applauded mightily in October 2011, when my iPhone 4S connected to iCloud and sent my content through iCloud to my Mac and iPad, it was an awesome moment!

So what is iCloud?  In short, it's a cloud based service that syncs your content and it is the best (and easiest)  option to back-up your iOS devices (iPhone, iPad, iPod Touch).  Let' start with syncing.  If you have multiple devices, and I'm not just talking about multiple Apple devices.  You can have an iPhone and a PC, or an iPad and a Mac, or an iPhone, iPad and Mac.  The combinations are endless (well not really but you get where I'm going).  If you have multiple devices iCloud will sync your content seamlessly as long as your iCloud settings are turned on, on the respective devices.


On the two screen captures above (from my iPhone), you'll notice most of the settings are green (or On), however I have a couple (Notes and Reminders) that are off.  The reason I have those two off is because I use other apps for my Notes (Evernote) and Reminders (Wunderlist).  By having Mail, Contacts and Calendar settings all set to on, it allows all content from those apps to be shared amongst any iCloud enabled device that I sign into with my Apple ID and Password.  So if I enter a new contact on my iPhone, iCloud takes that content to the ether, and passes it to my iMac and iPad (without me having to do anything except make sure the same iCloud settings are turned on, on those devices).  Below are the iCloud settings from my iMac.  There is a caveat for the Mail setting.  If your mail address is not an Apple email (@Mac, @Me, @iCloud), in most cases, not all, the mail setting will be grey (Off).  The reason being, if you use another mail host, like Gmail, Yahoo, Comcast or AOL, you don't need Apple to Sync or back up those systems.  Those other systems are supposed to handle that for you.  So if your iCloud account (Apple ID) is "xyz@gmail.com".  There is no need to have that setting on.  Make sense?  Good!


If you looked closely, you'd notice that on my iMac's settings, Notes is checked.  Why would I have it checked on my iMac, and not on my iPhone?  Because prior to using Evernote, I did use the Notes App on my devices, and if I turn the setting off on my iMac, it will erase the notes that are there, and I don't want to do that...:).  I also took screen captures of the Photos setting and the Documents and Data setting.

So as you can see, iCloud handles, or can potentially handle quite a bit of information.  If you chose not to use iCloud, as I mentioned earlier, you'd be stuck in iTunes hell!  

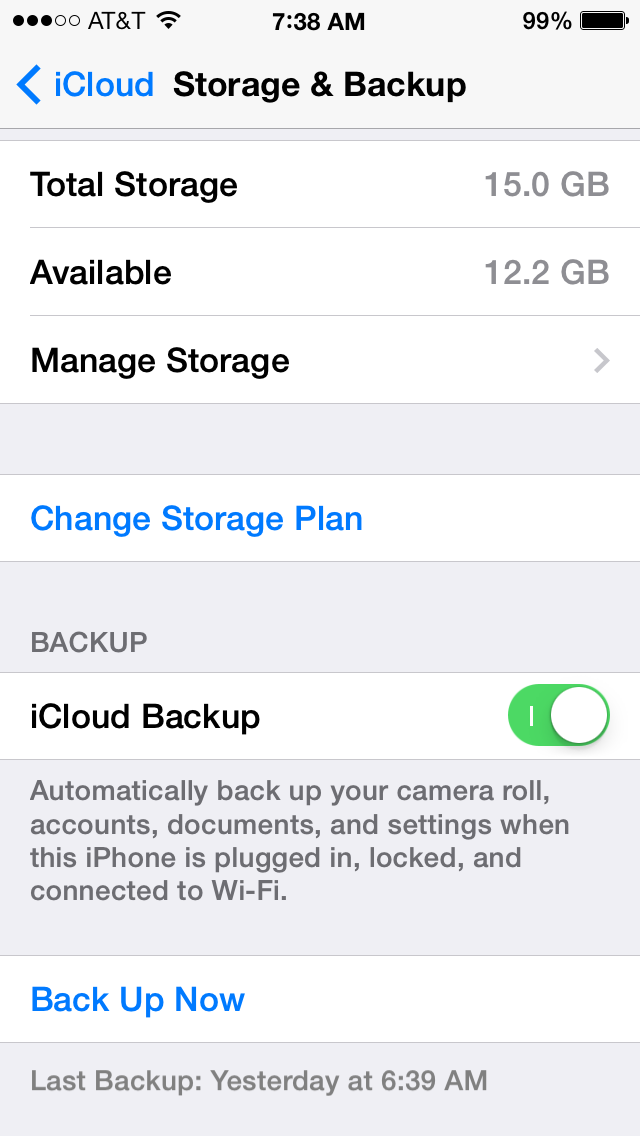
Now iCloud not only syncs your content, but, it also backs up your iOS devices.  Now, what does that mean, and how does that work you ask?  Great questions!  iCloud back ups work like this:  as long as the Backup setting is turned on (see below)


And your device is On, charging to an outlet, and you are in a wireless network, iCloud will ping your device, check when the last backup occurred (in my case 7:22 PM yesterday), and if you are beyond 24 hours since the last backup, iCloud will create a new backup for you.  Or, you can manually backup your iOS device by pressing the "Back Up Now" option if, and only if it is blue, as in the screen capture above (must be in wireless network for this to work).  Please keep this in mind.  iCloud only keeps 1 backup per device.  So you can manually backup as many times as you'd like during the day, but iCloud will only keep the latest.  Reason is because you only need 1 complete backup.  If you are charing your device, and in a wireless network, but your device is off, guess what will not happen, your device will NOT back up!  Any guesses as to why?  If you said "because when your device is off the GPS is disabled, and iCloud can't ping your device", you are 100% correct!  So, don't expect backups to occur when your device is off, because they will not!

Now I wrote about Photo Stream in an earlier blog, so I'm not going to go too much into it here, except to say that you should make sure your Photo Stream settings (below) for My Photo Stream and Photo Sharing are turned on.  The Burst Photos is specific to the iPhone 5S, no other devices currently have that capability.   If Photo Stream and Photo Sharing are off, your pictures will be stuck on your iOS device, until you will manually move them to your Mac (or PC).   


Now if you are a PC users with iOS devices, don't feel left out, you can download the iCloud Control Panel for your PC, and that will allow you to sync content between your iOS devices and your PC, nice move Apple!

Another key element of iCloud, is space.  How much do you get, how much does it cost, what if you run out!  When you create an iCloud account, you get 5GB of free storage.  If you have multiple devices attached to that iCloud account, you'll run out of 5GB quickly.  You can purchase an additional 10GB for $15/yr, 20GB for $40/yr, and 50GB for $100/yr.  Honestly, the additional storage is costly considering what other services offer.  I wonder if and when Apple will lower the prices here.

Finally, and perhaps most importantly, if you have an Apple ID for iTunes, should you use that for iCloud?  My best answer here is, it depends.  If you have a family, sharing an Apple ID for iTunes, I recommend each of you having your own Apple ID for iCloud.  An example would be family of four, mom, dad and two kids.  The Apple ID for iTunes has been set up under dad's email.  Now everyone has multiple devices, and if everyone is sharing dad's Apple ID for iCloud, you'll find you have no space to back up.  Not to mention your contacts, calendar events etc, etc, etc are a combination from everyones devices!  Yuck!  So Mom, and kids should create their own iCloud account (Apple ID).  Don't fret, you can still share calendar events and other content, you'll just share what you want to.  

Well I hope this iCloud intro has been helpful.  Until next time, best to you and your devices!


Sunday, March 2, 2014

Great iOS Apps.


Well I sure am glad we are out of February, it was ridiculously cold!  Hopefully that didn't stop you from checking out the great apps I highlighted last month on The MacMentor's Weekly posting on Facebook for the App of the week.  My goal with the app of the week postings is to make you more aware of the great tools out there for your iOS devices.  Then at the start of each new month, give a more in-depth review of those apps with these blog posts.

Ok, so the 1st app highlighted this past February was a cool note taking App that is a nice companion to Evernote.  The app is SwiftKey.


SwiftKey uses what it calls predictive technology, to advance the keyboard by learning how you write to better provide autocorrect and smart next word predictors or predictions.
SwiftKey Note gives you a cool new way to capture your thoughts, in an easy to use, beautiful app.  

SwiftKey is like Artificial intelligence for your iOS device.  The more you use it, the smarter it gets.  Even better, it connects with your EverNote account to further personalize your experience by making predictions based on your EverNote archive of notes.  Below you see screen shots from the SwiftKey app.  Under the +, you see the Elephant Head icon, which is the EverNote icon.  So you can create a note using SwiftKey, and store it in Evernote.   


One of the best features of SwiftKey is that it gets smarter as you use it more, and learns to adapt with you over time.  You can track your typing stats in settings, and watch your typing and productivity get better and better!  


Ok, for the week of February 9th, I choose the new app from Facebook, Paper as that weeks App of the week.  Facebook has been one of the top 50 iOS apps since it came out some six years ago.  But honestly, the app is tired and has needed a facelift for quite some time.  Well Facebook finally gave itself that needed facelift, sort of.  The Facebook app hasn't changed, but they did create a new one, called Paper, that is fantastic, and provides a much better user experience.  


One of my favorite features in Paper is the ability to Edit Sections.  Sections provide you with the ability to view things that the original Facebook app did not offer, sort of like news sections from different Sections of life.  The different Sections offered range from Pop Life, to Flavor, to Planet, to Family Matters.  

To get to Edit Sections, from the your page, or section (which is your home page, screen capture 1 below) take your finger, and swipe down on the screen.   That takes you to the Facebook Section (2nd screen cap below).  On that page, take your finger and swipe down


 Now you are taken to a page that will look similar to the one below.  


Next, you'll click on the Edit Sections field which takes you to a screen similar to the one below.  The lower portion of that screen let's you pick what will be displayed on your "Paper".  It's a cool concept, and adds some much needed life to what was an incredibly dull, boring Facebook experience on your iOS device.  


Once you've added the sections you wish to view, you click done (upper right corner of your screen), and you are taken to what is your Paper home screen.  From there you swipe along the lower portion of your screen to view the posts of your Facebook friends.  If you wish to view a post, you tap on it.  Notice below, the post in the middle that reads "Happy Independence Day".  I tap on that, and it full screens (2nd screen cap below).


So, all in all, Paper is a very cool, much needed update to the Facebook App.  If you visit the Facebook App on a regular basis, I highly recommend downloading and using the new Paper app instead!

Next up, an App that I use regularly to keep track of my to-do's.  It's called, Wunderlist.  


Wunderlist is flat out awesome!  It not only tracks your to-do's, but lets you create numerous to-do lists.  It's super easy to use interface lets you get up and going very quickly, and it's companion apps for the Mac and PC make it that much more lovable (not to mention, Wunderlist can also be accessed via the web!).  

When you open Wunderlist on your iOS device it looks like the screen cap below.


If you want to add a list, notice in the screen cap above the "+Add a list...", simply tap that and you can create a new list.  To create a new to-do, simply tap anywhere on the right side of the screen, and it brings you to a screen that looks like the one below.


Next, type in the name of the new to-do (I've typed "Create new blog" in the field).  Next, click the Done button.  It brings you to an editable screen (like the one below).  

From there, you set your to-do's Due Date.  If you wish to be reminded by Wunderlist, you can have it Remind you.  You can add a subtask, and finally any notes you wish for the particular to-do.  I've added screen caps below to take you through the process.  


All in all, Wunderlist rocks.  Oh yeah did I mention its FREE!  That doesn't hurt either...So if you want an App that gives you a bit more than the Reminders app that comes with your iOS device, go and download Wunderlist.  It's ease of use, and cloud syncing make it an A-list App!

The last App that I highlighted in February is "Keeper Password and Data Vault".  I've had many many clients and friends say to me, "how do I keep track of my numerous passwords, it's getting overwhelming"!  I absolutely agree.  Most of you probably have anywhere from 5-20 different passwords (maybe even more) to access everything from your AppleID, to your email, to your bank account, to countless other sites you access on your iOS device as well as on your computer.  There are endless App options out there to store your passwords, I choose Keeper because it gets fantastic reviews, it's works across platforms, it's easy to use, and its free!  


For obvious reasons I'm not going to show screen caps of my Keeper.  Some important things to know are:

Keeper uses work-class encryption technology, including 256-bit AES data storage.  PBKDF2 encryption keys (what are those you ask?   It's really great encryption technology is what you need to know!).  They also use Double encrypted syncing, and what's called Two-factor authentication.  If you don't understand that, just know it's great technology to keep your passwords safe!  

So, I hope you enjoy checking out and using the Apps that I highlight each month.  If you have a suggestion for the App of the week posting, by all means, don't hesitate to share it with me.  I love finding new apps to share!  

Till next time, best to you and your devices!


Tuesday, February 11, 2014

What is an AppleID?

Getting to know your AppleID

What a lovely spell of cold weather Mother Nature has dumped on us here in Chicago-land, or as we are now known, Chi-Beria!  Thankfully the cold hasn't stopped me from blogging!  Today's blog is inspired by my workshops.  At some of these workshops, I cover what I consider the "Basics" of your iOS Device.  I start in settings, and spend a good deal of time discussing the Apple ID.  Reason being, so many people just don't get it's importance.  So I thought I'd write about it in this edition of The MacMentor's blog, and how it ties into what I call, The Apple Ecosystem.

Apple has created quite a wonderful system for all it's device owners.  It started some 14 years ago with the introduction of the iPod and iTunes.  In order for the music you purchased to be tied to the correct device(s), Apple created the Apple ID.  Then a few years later along came iPhone and iPad,  all tied together using your Apple ID.  All part of the Apple Ecosystem.

Apple’s ecosystem consists of  your devices (Mac, iPhone, iPad, iPod Touch) as well as iTunes, iCloud, iMessage and FaceTime.  The key to the Apple ecosystem is the Apple ID.  Your Apple ID is an email address that Apple uses as a pointer to what I call "Your Apple locker".  Your locker of content within the Apple ecosystem.  Your Apple ID  is what you will use to sign in to the iTunes Store, Mac App Store, iCloud, iMessage and FaceTime.  When purchasing content through iTunes, your Apple ID tells Apple who’s “locker” the content should be assigned to, as well as what devices your content can be shared with.  It's how Apple knows not to assign my purchases to someone else's device(s).  With iCloud, your Apple ID is what Apple uses to push or sync your non entertainment content (Notes, Reminders, Calendar events, Contacts) to all your iCloud enabled devices.   

Another great part of this ecosystem, and a feature that I love is iMessage. 


I'm sure you've all texted from your iPhone.  Did you know you can text to and from your iPad, iPod Touch and your Mac using iMessage?  Oh yeah, did I mention it’s FREE!  That's right folks.  Take a quick look at your Message App on your iPhone.  Click on any message.  It's either Blue or Green.  Do you know why that is?  The green texts are texts that are not going through iMessage.  The blue texts are being sent through iMessage.  I can see you all shaking your heads going, ah that explains it!  How's this for fun.  Apple is basically giving the phone companies the "Bird" (middle finger) with iMessage.  A free way to text.  Of course it's only free to those on Apple devices, but if your whole family is on them, you can get rid of your texting on your cellular bill.  Nice.  

Now let's discuss FaceTime.  FaceTime is the video chat feature of Apple’s ecosystem, that got a great update with iOS 7 and Mavericks and now has what's called FaceTime Audio. 


FaceTime Audio let's you make voice calls through the Apple Ecosystem.  Really?!?!  Do you see what Apple is doing here?  Providing you with ways to no longer have to pay for cellular calls, or texting.  Go Apple!  So how does FaceTime work?  Simple, you sign into FaceTime with your Apple ID and you use the FaceTime App to video chat with anyone else who has a FaceTime capable device.  Real life story.  Last summer, my daughter was in Israel.  From a Kibbutz, she used her iPhone to FaceTime me.  Do you know how much it cost?  NOTHING!  It was completely FREE.  A video call from Israel to Deerfield and it was Free!  Can't beat that with a stick...

Ok, that’s a high level of what your Apple ID does for you within the ecosystem, now let’s break it down further first by iTunes, and the Mac AppStore, then iCloud and iMessage.  

iTunes is the heart of the Apple Ecosystem.  It came to life Thirteen years ago, in January of 2001.  iTunes is where you purchase entertainment for your Apple Devices.  What started out as a cool place to buy and store your music has evolved into an incredible online entertainment store, where you can not only buy music, but movies, TV shows, Apps for your iPhone/iPad/iPod touch and much more.  You can even take classes from many of the top Universities around the world through iTunes U!  Whichever device you choose to purchase entertainment content from, you are required to enter your Apple ID (and password).  This allows Apple to correctly share that content to the proper devices.  The Mac App Store works the same way as iTunes, only it’s content is specific to Mac computers, where iTunes content can be used on all Apple devices, and on PC's.

Now on to iCloud.  The iCloud service is Apple’s latest attempt at cloud storage and syncing, and it blows away its predecessor, MobileMe.  What iTunes is for entertainment content, iCloud is for your personal, non-purchased content.  The iCloud service is available on all Mac’s running at least OSX 10.7 and all iOS devices running at least iOS 5.0 (I hope you are all at iOS 7!!).  To enable iCloud on your Mac computers, you’ll go into system preferences, click the iCloud preference, and login in with, you guessed it, your Apple ID! 


On your iOS device, you’ll tap on settings, and scroll down to the iCloud setting, tap, and sign in with...your Apple ID!  Then you’ll choose which content you desire to sync and backup through iCloud.  


Now what some people don’t realize is that iCloud can and should be used to back up your iOS device(s)!  Wirelessly!  How does one go about that you ask?  Good question!  All you’ll need is the white cord and power supply that came with your device, an electrical outlet and a wireless network.  Plug the appropriate ends of the cord into the iOS device and the power supply, plug the power supply into the outlet, put your device to sleep ( or let it go to sleep on its own), and if you are connected to a wireless network, iCloud will find your device, when the last backup was initiated and if it was over 24 hours ago, it will back up your device.  Once a day, iCloud will back up your non-purchased content (mail, if you have an iCloud account, Contacts, Calendar events, Reminders, Notes).  


A couple of other great features of iCloud are Photo Stream, Documents and Data and Find my iPhone.  Photo Stream let’s you share pictures, wirelessly, between all your Apple devices.  Now, on your Macs, you be have the appropriate version of iPhoto (which comes on all Macs circa late 2011 and forward).  If you are running an older Mac with OSX 10.7 or later, and have yet to upgrade iPhoto, you will NOT have Photo Stream on your Mac.  Upgrading iPhoto is simple, go to the Mac App Store and download it for $14.99.  Photo Stream will house up to 1000 pictures at a time, for up to 30 days.  Here’s how it works.  You take pictures with your iOS device, and when you get to a wireless network, those pictures get pulled up to iCloud and will be available in your Photo Stream.  So after a day of picture taking, you can come to your Mac and see those pictures in iPhoto, without having to do anything!  Just click on the Photo Stream option in iPhoto and your pictures are virtually there.  If you use the iWork suite of tools (Pages, Keynote and Numbers), iCloud can be used to sync your content from those applications between your devices.  So you can create a Keynote presentation on your Mac, save it to iCloud, and open it on your iOS device, very, very cool!  The Find My Phone service of iCloud is indispensable.  If you’ve misplaced your iOS device, or sadly if it gets stolen, you can log into iCloud.com (with your Apple ID!), and locate it!  That is awesome for those of us who quite often forget where we leave our devices!  It works using the GPS on your device to locate and display that information to a Map on iCloud.com, very cool!  I once had a customer who had her phone stolen, and we were able to track it on iCloud.com.  We called the police, informed them of where it was, they tracked down the perpetrator and got my client her phone back!  Technology at work!

That friends, is a high level overview of your AppleID, the Apple ecosystem and it’s benefits.  For more in depth help, please contact me to set up an appointment!

Enjoy your day, and until next time...Best to you and your devices!


Monday, February 3, 2014

Great devices for your iPhone and iPad.

To start off 2014, I decided to not only do an App of the Week post on my Facebook page, but to include a Device of the Week as well.  There are so many different types of devices out there, all you need to do is head to an Apple Store (or online to Amazon) to see a wide variety, ranging from wireless speakers to heart monitors, to home heating systems and beyond.  I decided to highlight one per week, then create a blog at the beginning of the following month to highlight those devices.  Here's my list for January!

First, the Tego Power Grid.  We are all looking for ways to extend the life of our devices, well look no further.  Tego has created a fantastic device.  For starters, it packs enough power to charge your device twice without needing to be re-charged itself.  Can easily be recharged by plugging into the USB slot of a computer.  It's super compact and light-weight, and best of all, is only $59.00.


So if you are one of the many people who always find themselves looking for an outlet to charge their devices, go get yourself the Tego, you'll be happy you did.

The next device that I highlighted in January just blows me away.  For those of you who still don't realize that there is an app for almost anything, check this baby out...Have you ever found yourself looking for a device, or system to help you keep track of your health?  A device or system that won't cost you an arm and a leg, but tracks and monitors you throughout the day?  Well if you fit that description, I've found the perfect device for you!  It's the Fit Systems Arm band by Body Media.  


If you are overweight, and looking for help counting calories, this beauty helps you keep track of your caloric count.  The calories going in, and the calories burned!  Sweet!  It helps you achieve your fitness goals by accurately tracking your daily activities.  Finally, it monitors how well you are sleeping!  As you may expect, the device comes with an App, to help you keep track of things while you are on the go.  So whether its you looking for some help with your health, or someone you know, I highly recommend the Fit Systems Arm band.

Ok...So the first two devices for January were quite cool.  The 3rd device that I highlighted in January is downright HOT!  Now if you are like me, you like your music clean, with rich bass and ultra-clean treble.   There's nothing worse for me than listening to some great music on some cheap speaker system with wimpy bass and treble that's overly tin-ee.  It's challenging to find small speakers that measure up!  We'll the UE Boom wireless speaker, from Ultimate Ears, ROCKS!   It will take the best bass from John Paul-Jones, and play it true.  It will make Miles Davis' horns shine.  All the while pulsating through a Neil Peart drum solo like a full blown set of floor speakers.  Yeah, it's that good!


The Boom starts at $199 (The limited edition Boom, the one right above, is $229).  An incredible feature of the Boom, that's not currently available on any other wireless speaker (that I know of), is that you can connect two Boom's via the Boom App to have totally mind blowing experience!  


So if you love your music, loud and crystal clear, the UE Boom is exactly what you've been looking for.  It can be found online, or at retailers like The Apple Store.

Ok, now for the final January device of the week...

In keeping with my music theme, my next device stays in the music genre.  I've attended more concerts in my lifetime than I can remember.  I followed the Grateful Dead for a bit in the early 90's, have seen more than my share of Dave Matthews shows as well.  I always wanted to record my concerts, but never had the right equipment.  Well look no further my friends.  Let me introduce you to the IQ5 Stereo Recorder.  


The iQ5 is a high quality stereo condenser mic.  Perfect for recording your favorite concert, or your child's first piano concert.  The iQ5 has a rotating device that allows audio recording with the optimal left-right stereo orientation, regardless if you are using it horizontally or vertically.

The Zoom has a companion app that allows you to record in linear PCM, 16-bit/44.1kHz format for CD-quality audio, that accurately captures the music and spaces.  It even records in compressed AAC format when you need smaller faster data transfer.  


Now I realize that to most of us the kHz and AAC compression won't really matter.  It was more for the audio files that read my blog (ha ha ha!).  All the rest of us need to know is that it records well, and can record in compressed format if you need to!  

So there are my choices for January's Apps of the Week.  The Tego Power Grid, The Fit Systems Arm band, The UE Boom Speaker, and finally the iQ5 Zoom recorder.  Keep up with my February Apps of the Week on my Facebook page, http://facebook.com/theMacMentor, then comeback early March and I'll have another blog post for the February App/Device of the week choices.

Thanks to all for reading...and if you have a favorite App/Device let me know about it!

Until next time, Best to you and your devices!


Friday, January 17, 2014

Google Docs vs. Pages for iCloud

Google Documents vs. Pages for iCloud


The past few years have seen a big push by technology companies to get more and more things done “in the cloud”.  Both Google and Apple have been key players in this arena.  I think it’s safe to say that Google has done more, and done it better, than Apple.  Where Apple’s strength has resided in hardware and integration of its software to that hardware.  Apple did get a head start with their “cloud” services, introducing .Mac back in 2002.  .Mac provided email service, 100mb of storage, plus hosting of your website(s).  Apple charged $100/year for this service and it was not very good.  Two years later,  Gmail came online.  It was the beginning of Google's “cloud” services,  and for the most part got rave reviews (I’ve been a GMail users since the summer of 2004).    Apple more or less stumbled through .Mac, which was later replaced by MobileMe in 2008.  One of MobileMe’s intended uses was as a syncing technology for content on your Apple devices (poor man’s iCloud).  Sadly MobileMe was a constant source of headaches for users and Apple.  Meanwhile, Google was quietly building (and buying) a cache of better than adequate “cloud” products and tools.  Which leads us to today’s blog, where I compare Google Docs to the newly released Pages for iCloud. 

Google Docs had a significant head start, as it’s been around (in various forms) since 2005.  It officially came out of “beta” status in 2009, giving it an unofficial  four year head start over Pages for iCloud.  Google Docs provides Google users with a free web-based word processor.  If you have a Google account, you simply log in, click on Google drive, then Click Create, and you have the option to create a Document, Presentation, Spreadsheet, Form or Drawing.  


If you click on the Document option, The screen capture above is  a glimpse of what your document window looks like for Google Docs.  Similar to many desktop word processors you have a full set of menu options.  Left to right you have File, Edit, View, Insert, Format, Tools, Table and finally Help.  Below are the File Menu options.  One option you may notice to be missing is the Save and Save As options.  That’s because with Google Docs, as you edit, it saves automatically.


The next menu option we’ll look at is the Edit menu option.  Again very similar features to most desktop word processors, from the Undo option, down to Find and replace. 


Another menu option I want to point out here is the Font option.  On the 2nd row of tools, the Row that starts with the Printer icon, in between the Style button, and Font size button is Fonts.  When you click on the Fonts button, you only get 8 fonts off the bat.  Don't fret, you have the ability to choose more.  Simply slide down to the more fonts option and you'll find a rather exhaustive list of fonts for your writing pleasure!  


Another nice feature of Google Docs, is the ability to share your documents with your co-workers, friends, family, teachers etc. etc.  Simply press the Share button.  Once you do, you'll be prompted with the screen capture you see below.  Google creates a link, you can share via email, Google+, Facebook or Twitter.  You can even have multiple people editing a document at the same time, not that you'd want to...:).  


Now I’m not going to go through each menu option here, the point I’m trying to get across to you, is that you’ve got a nice option here with Google Docs if you are looking for a free on-line document creation tool.  Oh yeah, did I mention it's free, as long as you've got a Google account.  Also, Google Docs can be created on any browser (using any computer), and the documents can also accessed on your iOS (and Android) devices as well, through the Google Drive App.  

This is a great tool which gives you incredible flexibility with your documents.  Create them from your computer, and when you are on the go, or away from your office, use your iPhone or iPad to edit the document as you need.  

Ok, now let's see how Apple's Pages compares to Google Docs.

It’s taken Apple considerably longer to bring the iWork suite online, but, at least they’ve done a better than average job now that Pages is available.  To use Pages (in iCloud), you must have an iCloud account.  To access Pages, you sign into iCloud.com and simply click the Pages icon (see below).  


What you see above is the new landing page.  All new icons (to match iOS 7).  On the lower row, you'll see Pages, Numbers and Keynote.  To start a new document, simply press the Pages icon.  If you already are a Pages user, your screen will look similar to mine below.  You'll see your documents, and perhaps folders if you've chosen to create them.  If you are a new user, you'll only see the + icon, which is what you'll click to create a new document.


Interestingly, folders are created on your iOS device.  As of this writing, with Pages still in beta, you can't yet create folders from the browser.  Document folders work the same as App folders on your device.  You can drag a document into the folder, and also out of the folder (from your device, not from a browser).  Ok, let's move on to creating a new document.  An AWESOME feature in Pages is the ability to choose from numerous document templates!  This is something NOT offered in Google Docs.  So whether it's just a plain document you need to create, or a report, or letter or resume, Pages gives you multiple templates from which to choose (see three screen captures below).  Advantage Pages!  


There are more templates than the ones I've shown above.  There are envelope templates, business card templates, flyer and poster templates, card templates and finally newsletter templates.  Apple has really taken into account what type of document you may be creating, and given you some great templates to help you make the best document possible!

For the purposes of this blog, I'm going to create a blank document.  Here's what it looks like.


As you can see, you are presented with a new window.  Unlike Google docs which opens up within Google drive.  Not that it really matters, but with iCloud Pages, it really looks like you are using a desktop application!  Along the top, you have a button to enlarge, or shrink the page.  You have Undo and Redo buttons.  Next you see buttons for Text, Shape and image.  Clicking Text will drop a text box on your document.  Clicking Shape will provide you with a series of shapes you can add to your document.  Finally the image button will let you add an image to your document.  

Now Apple recently updated the Mac version of Pages.  Ideally, it look and works exactly the same as the web version.  This is great as you only have to learn how to use it one place to be able to use it anywhere!  The iOS version also has the same interface.  

On the above screen capture, on the right side, you see options for your text.  First you have paragraph style, below that Font, then Alignment, Line Space, Paragraph Spacing, List Style, then finally Indent.  All the options cleanly laid out, easy to see, and more important, easy to use!

Pages in iCloud alleviates the need to save your documents.  It simply saves as you type.  Google Docs also does this.  It's a wonderful feature that saves you the worry of wondering if you saved your doc and when it was last saved, and you can't put a price on that!

Similar to Google Docs, Pages gives you the option to Share your document.  Along the top toolbar (above), you'll see the Share button.  Press it and you'll see a window like the screen capture I'm displaying below.


Click the email button and you can email the document link to multiple people, who can in turn edit the document and save it back to your iCloud!  Nice...

Pages let's you share the document in multiple formats as well.  You can save it in either the Pages format, Word format or as a PDF.   Google Docs only lets you save as a Google Doc type.  Another win for Pages.  

The Tools button gives you a series of choices (the screen capture below).  There you have the Find & Replace option, additional settings, Help.  You can also download a copy, email or print the document, go back to all your docs, or finally Sign out.  


One other item of note for pages, it lets you upload a Word document, edit it, and even save it back to Word format.  Can't do that in Google Docs.

I really love what Apple has done with Pages in iCloud.  It's a wonderfully full featured cloud based word processor.  Like Google Docs, it's free (to those with an iCloud account).  I highly recommend trying and getting comfortable with it.  If you have an iPhone 5S or 5C or iPad Air, you can download Pages for those devices for free.  Giving you the ability to have your documents with you anywhere you go.  

In conclusion, both cloud based word processors are very very good.  They are easy to use, full featured, and give you access to your documents where ever you are (via your iOS devices).  Not to bash Microsoft (even though I thoroughly enjoy doing that!), as they also have a cloud version of Office (Microsoft 365), but guess what?  They charge you for it!  $99 dollars a year, or $9.95 a month.  Why bother when you have two great options that are free!  

I hoped you enjoyed today's blog, and I hope you try one or both of these cloud document tools out as it's the future, and it's better to be comfortable with it sooner rather than later!

Until next time, best to you and your devices.  And as always, I welcome your comments.