Showing posts with label #AppleHelp. Show all posts

Monday, June 2, 2014

iOS 8...A Preview.

Are you comfortable with iOS 7 yet?  If not, lets hope you get there, and quick!  Because iOS 8 is right around the corner!  On Monday during the Keynote of the WWDC Apple gave us a preview of the fantastic things coming our way this fall in iOS 8, and there are many!

Among the features that have me most stoked, are the awesome features that allow Apps to share data, or what I will refer to the Unification of your Apple technology.  Imagine you are in your home office, located on the lower level of your house.  Your iPhone is upstairs in your bedroom.  iPhone rings, and so does your iMac!  That's right, your Mac's (running Yosemite) will have the ability to answer calls from your iPhone!  Whoa, want to run that by me again fella??  You read correctly.  Oh, and did I mention that your iPad can answer that call coming into the iPhone as well?  There are some caveats to the above, your devices need to be on the same wireless network for that incredible feature to work.  You'll also be able to start an email on your Mac, and finish it on your iOS device, or vice versa, very cool indeed.  One of my favorite new features is iCloud Drive.  Apple's looooong overdue attempt to bring iCloud to the mainstream user.  iCloud Drive will add many new Dropbox/Google Drive like features.  For starters you'll be able to upload any file type to your iCloud Drive, and you can do it easily on your Mac using Finder!  Apple didn't announce an iCloud Drive app for the iPhone or iPad, but I can't imagine it's far behind.  For now, on your iPhone or iPad you'll have to go into the App the uses the particular file to open it.

Within iMessage, Apple has revealed a new push-to-talk, as well as push-to-video feature that's akin to those same services within the very popular WhatsApp and the Voxer App.  

There's interactive Notifications, which from the looks of it will be very useful.  If you get a message while you are creating a presentation in Keynote, and don't feel like going to the Messages app, you'll be able to reply directly from the Message Notification, that is cool!

There are some great updates to the Mail app, as well as Spotlight Search that I think you'll find incredibly useful

There's also a new native feature on the iOS keyboard that Apple is calling QuickType, that uses "language models" to predict words before they are typed.  How long till an App can type what I'm thinking!!  Yikes I bet that's not too far off my friends...:).  

There's a new feature called Mark-Up, which is an extension to both Mail and Safari that let's you edit attachments by drawing on them.  I'll wait to make any judgements till I use this feature.  

Here's another great feature that should help in your everyday life.  Perhaps not right away, but definitely in the long haul, Apple's new HealthKit App.  Consider it a one stop shop for all your health data that other Apps currently collect, like Jawbone's UP.  Apple has teamed up with key partners, including Mayo Clinic to help you keep track of measurements that matter most to you.  

Lastly (for now), Siri has even gotten smarter.  This is a good thing, because I've started to use Google's Now feature (found in the Google App) on my iPhone because I've found it works far better than Siri.

There will be plenty more to information on iOS 8 in the coming months prior to it's eventual release (early fall 2014).  I'd love to hear from you as to the features you are most excited about.

Until next time, best to you and your devices!

Monday, March 3, 2014

Great iPhone and iPad devices

Not to be outdone by our sister post, the February App of the week, here comes the February Device of the week blog post.  February's devices covered a couple of different areas.  There were two devices that helped you keep track of things, Tile and the Tagg Pet Tracker.  There was what I consider may be the Device of the year, the Lacie Fuel which provides much needed storage wirelessly to your iOS devices (and computers too!).  Then finally there was the Jawbone UP, a great tool to help you keep up with your sleeping, eating and overall health.

Now my first device, the Tile, is not out yet, however it's completely SOLD OUT it's pre-orders.  To the point where close to 50,000 Tile's have been pre-ordered to date!  Not bad.  So what is Tile?  Let's find out...

Tile is a tiny square device that attaches to stuff you don't want to loose.  Could be a piece of luggage, a child's back-pack, a set of keys.  Here's what it look like.  In the screen capture below, it's attached to a keyring.  So you can see, the device is quite small.


The Tile App lets you find your Tile(s) anywhere they may be.  You can have up to 10 Tiles on one account, and you can share access to your Tiles with friend or family members.  If triggered, an alert is sounded.  If you can hear the alert, you can find the Tile.  Another cool feature, your Tile App remembers where it last saw the Tile, which should help you find it if you can't remember where you left it...

Some other cool features:  The App lets you know when you are getting "warmer" to your Tile.  There are no batteries needed, the Tile lasts 1 year, and  you'll get a reminder when it's time to order your new Tile.  For more info, or to order your Tile device, head over to
http://www.thetileapp.com

Keeping with the previous theme of helping you find things, the next App I want to highlight is the Tagg Pet Tracker.   The Tagg system is very cool.  It lets you to track your pets location and activity from your computer and you iOS device as well.  Your can see where your dog is, and monitor it's activity levels as well.  The tracker is lightweight, and it easily attaches to your pets collar, and if your dog swims, it can even be worn while swimming...Nice!  The tracker basically turns your pets collar into a GPS device, awesome!
For additional information, or to purchase this great device for your pet, head on over to http://www.pettracker.com.


Ok, switching gears from our tracking devices, here is a device that I'm nominating for Device of the Year.  The Lacie Fuel.


Ok, so what is the LaCie Fuel?  It's a 1TB (that's 1 TerraByte, or 1000 giga bytes) of wireless storage!  Now, I know what you are thinking, it's a 1TB hard drive, right.  So what's so special about this one, there are plenty of 1TB hard drive out there, right?  Well Yes, there are plenty of 1TB hard drives available, but how many of them have wireless capability, and how many of them connect to your iOS device??  As far as I know, this is the first, and coming from LaCie, a company that makes some of the best external drives available, that makes it awesome!  You can share the Fuel with up to 5 devices, at once! It even works with the AppleTV.  How does it work?  The Fuel creates it's own wi-fi network!  Get this, you can stream HD movies to three devices at once!!  How awesome for a family vacation!  You'll also download the Seagate media app to all the devices that you wish to access the Fuel.  

This is just tremendous!  It turns your 16GB iOS device into a 1TB iOS device.  
The Fuel cost $199, consider it priceless for the extra storage it gives your iOS devices.    
http://www.lacie.com/products/product.htm?id=10618

Ok, wrapping up my February devices, the Jawbone Up.  


The Up is way more than a device, it's a personal health tracking system.  The Up has a companion iOS app that syncs what the Up captures, and displays for you.  So what exactly does the Up track you ask?  Many things...:).  For one, it tracks your sleep.  You set up your sleep goals, and the Up then tracks how long you slept, how long you were in light sleep, deep sleep, how long it took you to fall asleep, and even if you woke up!  How cool is that?!?


You can also set goals for your steps during the day (my goal is 10,000).  The Up tracks your steps, then you can sync the Up to your iOS device to enter your steps.  I Sync my Up periodically through the day.  Some people sync once a day, it's totally up to you!

The most challenging part of the Up system is tracking your eating.  The device won't do that for you, that is a manual process, but with the App, you can scan in your food and it captures all the information about what you just ate!  So if you are looking for a way to help yourself keep track of your health, check out the UP.  I've been using it since Valentines day, and I love it.  It's helped me monitor things I never thought of, and can help you as well!

Ok, there's your more in depth breakdown of the February Device of the week postings.  I hope you've found the breakdown helpful, and I hope you check the devices out.

Until next time, best to you and your devices!


Sunday, March 2, 2014

Great iOS Apps.


Well I sure am glad we are out of February, it was ridiculously cold!  Hopefully that didn't stop you from checking out the great apps I highlighted last month on The MacMentor's Weekly posting on Facebook for the App of the week.  My goal with the app of the week postings is to make you more aware of the great tools out there for your iOS devices.  Then at the start of each new month, give a more in-depth review of those apps with these blog posts.

Ok, so the 1st app highlighted this past February was a cool note taking App that is a nice companion to Evernote.  The app is SwiftKey.


SwiftKey uses what it calls predictive technology, to advance the keyboard by learning how you write to better provide autocorrect and smart next word predictors or predictions.
SwiftKey Note gives you a cool new way to capture your thoughts, in an easy to use, beautiful app.  

SwiftKey is like Artificial intelligence for your iOS device.  The more you use it, the smarter it gets.  Even better, it connects with your EverNote account to further personalize your experience by making predictions based on your EverNote archive of notes.  Below you see screen shots from the SwiftKey app.  Under the +, you see the Elephant Head icon, which is the EverNote icon.  So you can create a note using SwiftKey, and store it in Evernote.   


One of the best features of SwiftKey is that it gets smarter as you use it more, and learns to adapt with you over time.  You can track your typing stats in settings, and watch your typing and productivity get better and better!  


Ok, for the week of February 9th, I choose the new app from Facebook, Paper as that weeks App of the week.  Facebook has been one of the top 50 iOS apps since it came out some six years ago.  But honestly, the app is tired and has needed a facelift for quite some time.  Well Facebook finally gave itself that needed facelift, sort of.  The Facebook app hasn't changed, but they did create a new one, called Paper, that is fantastic, and provides a much better user experience.  


One of my favorite features in Paper is the ability to Edit Sections.  Sections provide you with the ability to view things that the original Facebook app did not offer, sort of like news sections from different Sections of life.  The different Sections offered range from Pop Life, to Flavor, to Planet, to Family Matters.  

To get to Edit Sections, from the your page, or section (which is your home page, screen capture 1 below) take your finger, and swipe down on the screen.   That takes you to the Facebook Section (2nd screen cap below).  On that page, take your finger and swipe down


 Now you are taken to a page that will look similar to the one below.  


Next, you'll click on the Edit Sections field which takes you to a screen similar to the one below.  The lower portion of that screen let's you pick what will be displayed on your "Paper".  It's a cool concept, and adds some much needed life to what was an incredibly dull, boring Facebook experience on your iOS device.  


Once you've added the sections you wish to view, you click done (upper right corner of your screen), and you are taken to what is your Paper home screen.  From there you swipe along the lower portion of your screen to view the posts of your Facebook friends.  If you wish to view a post, you tap on it.  Notice below, the post in the middle that reads "Happy Independence Day".  I tap on that, and it full screens (2nd screen cap below).


So, all in all, Paper is a very cool, much needed update to the Facebook App.  If you visit the Facebook App on a regular basis, I highly recommend downloading and using the new Paper app instead!

Next up, an App that I use regularly to keep track of my to-do's.  It's called, Wunderlist.  


Wunderlist is flat out awesome!  It not only tracks your to-do's, but lets you create numerous to-do lists.  It's super easy to use interface lets you get up and going very quickly, and it's companion apps for the Mac and PC make it that much more lovable (not to mention, Wunderlist can also be accessed via the web!).  

When you open Wunderlist on your iOS device it looks like the screen cap below.


If you want to add a list, notice in the screen cap above the "+Add a list...", simply tap that and you can create a new list.  To create a new to-do, simply tap anywhere on the right side of the screen, and it brings you to a screen that looks like the one below.


Next, type in the name of the new to-do (I've typed "Create new blog" in the field).  Next, click the Done button.  It brings you to an editable screen (like the one below).  

From there, you set your to-do's Due Date.  If you wish to be reminded by Wunderlist, you can have it Remind you.  You can add a subtask, and finally any notes you wish for the particular to-do.  I've added screen caps below to take you through the process.  


All in all, Wunderlist rocks.  Oh yeah did I mention its FREE!  That doesn't hurt either...So if you want an App that gives you a bit more than the Reminders app that comes with your iOS device, go and download Wunderlist.  It's ease of use, and cloud syncing make it an A-list App!

The last App that I highlighted in February is "Keeper Password and Data Vault".  I've had many many clients and friends say to me, "how do I keep track of my numerous passwords, it's getting overwhelming"!  I absolutely agree.  Most of you probably have anywhere from 5-20 different passwords (maybe even more) to access everything from your AppleID, to your email, to your bank account, to countless other sites you access on your iOS device as well as on your computer.  There are endless App options out there to store your passwords, I choose Keeper because it gets fantastic reviews, it's works across platforms, it's easy to use, and its free!  


For obvious reasons I'm not going to show screen caps of my Keeper.  Some important things to know are:

Keeper uses work-class encryption technology, including 256-bit AES data storage.  PBKDF2 encryption keys (what are those you ask?   It's really great encryption technology is what you need to know!).  They also use Double encrypted syncing, and what's called Two-factor authentication.  If you don't understand that, just know it's great technology to keep your passwords safe!  

So, I hope you enjoy checking out and using the Apps that I highlight each month.  If you have a suggestion for the App of the week posting, by all means, don't hesitate to share it with me.  I love finding new apps to share!  

Till next time, best to you and your devices!


Wednesday, February 19, 2014

Merging contacts on your iPhone and iPad.


Do you a contact problem on your iOS device?  Do your duplicates stress you out??   It’s practically inevitable that duplicate contacts appears on your iOS device either by accident, typos, through sharing vCard information with others, or from something as basic as a contact changing their name and addresses, for which an additional entry gets added. Prior to iOS 7, there was no simple way of handling multiple contact entries on your iOS device, but that has finally changed, and now there is an easy way to merge those contacts directly and easily!  


Ok, this will be fantastic for those of you that experience DCS!  Because this is done on your iOS device, you do not need to to sync to iCloud, iTunes  or any other computer for the change to take effect, you simply make the change directly on your iOS device, and iCloud, takes care of pushing the changes automatically to any other iOS and OS X devices that use the same Apple ID.


I've got screen captures just below to assist.

This fantastic new feature is not actually called Merge, but rather Link Contacts, which is possibly why it’s  often missed, or overlooked, regardless, here is what you do!

  1. From your iOS device, tap the Contacts app (or on your iPhone, tap the phone app) , open the contact you wish to merge another duplicate contacts with.  
  2. Next, tap on the “Edit” button
  3. Scroll down toward the bottom to find Link Contacts, then tap on the green plus icon “(+) link contacts…” to link/merge the contact with another.
  4. Then, locate the contact to merge (either a duplicate or a changed addressee) and tap on the name, then tap on “Link” in the corner
  5. Repeat for more than one duplicate, otherwise tap on “Done” to finish the merging
Yeah!!  This instantly links/merges all contact details from the two (or more) contact cards into a single contact entry, it does not overwrite any information, it simply merges all details into a single contact.
In the screenshots below, the address information for multiple AT&T contacts has been merged into a single card. The first contact edited will be the one that accepts the merged details:


Once you click “Done”, there will only be a single contact for the details you merged (linked), in this example I've Merged/Linked two AT&T accounts.
One great thing about the “Link Contacts” method is that although it merges the contacts,  it can very easily be  undone if you decide to unmerge/unlink the contact details. To do that, just go back to the contact in question, tap on “Edit” and then tap on the red (-) icon along the linked contacts details.
There are other ways to Merge/Link contacts,  but I'm not going to address those here.  Today I simply wanted to point out a great feature that was added to iOS 7.  
So now it's up to you!  If you are loaded with duplicate contacts, you've been given the green light to get rid of them!  It may take some time, but will definitely be worth it.  Free you device of DCS!
Until next time, best to you and your fewer contacts...:).

Friday, January 17, 2014

Google Docs vs. Pages for iCloud

Google Documents vs. Pages for iCloud


The past few years have seen a big push by technology companies to get more and more things done “in the cloud”.  Both Google and Apple have been key players in this arena.  I think it’s safe to say that Google has done more, and done it better, than Apple.  Where Apple’s strength has resided in hardware and integration of its software to that hardware.  Apple did get a head start with their “cloud” services, introducing .Mac back in 2002.  .Mac provided email service, 100mb of storage, plus hosting of your website(s).  Apple charged $100/year for this service and it was not very good.  Two years later,  Gmail came online.  It was the beginning of Google's “cloud” services,  and for the most part got rave reviews (I’ve been a GMail users since the summer of 2004).    Apple more or less stumbled through .Mac, which was later replaced by MobileMe in 2008.  One of MobileMe’s intended uses was as a syncing technology for content on your Apple devices (poor man’s iCloud).  Sadly MobileMe was a constant source of headaches for users and Apple.  Meanwhile, Google was quietly building (and buying) a cache of better than adequate “cloud” products and tools.  Which leads us to today’s blog, where I compare Google Docs to the newly released Pages for iCloud. 

Google Docs had a significant head start, as it’s been around (in various forms) since 2005.  It officially came out of “beta” status in 2009, giving it an unofficial  four year head start over Pages for iCloud.  Google Docs provides Google users with a free web-based word processor.  If you have a Google account, you simply log in, click on Google drive, then Click Create, and you have the option to create a Document, Presentation, Spreadsheet, Form or Drawing.  


If you click on the Document option, The screen capture above is  a glimpse of what your document window looks like for Google Docs.  Similar to many desktop word processors you have a full set of menu options.  Left to right you have File, Edit, View, Insert, Format, Tools, Table and finally Help.  Below are the File Menu options.  One option you may notice to be missing is the Save and Save As options.  That’s because with Google Docs, as you edit, it saves automatically.


The next menu option we’ll look at is the Edit menu option.  Again very similar features to most desktop word processors, from the Undo option, down to Find and replace. 


Another menu option I want to point out here is the Font option.  On the 2nd row of tools, the Row that starts with the Printer icon, in between the Style button, and Font size button is Fonts.  When you click on the Fonts button, you only get 8 fonts off the bat.  Don't fret, you have the ability to choose more.  Simply slide down to the more fonts option and you'll find a rather exhaustive list of fonts for your writing pleasure!  


Another nice feature of Google Docs, is the ability to share your documents with your co-workers, friends, family, teachers etc. etc.  Simply press the Share button.  Once you do, you'll be prompted with the screen capture you see below.  Google creates a link, you can share via email, Google+, Facebook or Twitter.  You can even have multiple people editing a document at the same time, not that you'd want to...:).  


Now I’m not going to go through each menu option here, the point I’m trying to get across to you, is that you’ve got a nice option here with Google Docs if you are looking for a free on-line document creation tool.  Oh yeah, did I mention it's free, as long as you've got a Google account.  Also, Google Docs can be created on any browser (using any computer), and the documents can also accessed on your iOS (and Android) devices as well, through the Google Drive App.  

This is a great tool which gives you incredible flexibility with your documents.  Create them from your computer, and when you are on the go, or away from your office, use your iPhone or iPad to edit the document as you need.  

Ok, now let's see how Apple's Pages compares to Google Docs.

It’s taken Apple considerably longer to bring the iWork suite online, but, at least they’ve done a better than average job now that Pages is available.  To use Pages (in iCloud), you must have an iCloud account.  To access Pages, you sign into iCloud.com and simply click the Pages icon (see below).  


What you see above is the new landing page.  All new icons (to match iOS 7).  On the lower row, you'll see Pages, Numbers and Keynote.  To start a new document, simply press the Pages icon.  If you already are a Pages user, your screen will look similar to mine below.  You'll see your documents, and perhaps folders if you've chosen to create them.  If you are a new user, you'll only see the + icon, which is what you'll click to create a new document.


Interestingly, folders are created on your iOS device.  As of this writing, with Pages still in beta, you can't yet create folders from the browser.  Document folders work the same as App folders on your device.  You can drag a document into the folder, and also out of the folder (from your device, not from a browser).  Ok, let's move on to creating a new document.  An AWESOME feature in Pages is the ability to choose from numerous document templates!  This is something NOT offered in Google Docs.  So whether it's just a plain document you need to create, or a report, or letter or resume, Pages gives you multiple templates from which to choose (see three screen captures below).  Advantage Pages!  


There are more templates than the ones I've shown above.  There are envelope templates, business card templates, flyer and poster templates, card templates and finally newsletter templates.  Apple has really taken into account what type of document you may be creating, and given you some great templates to help you make the best document possible!

For the purposes of this blog, I'm going to create a blank document.  Here's what it looks like.


As you can see, you are presented with a new window.  Unlike Google docs which opens up within Google drive.  Not that it really matters, but with iCloud Pages, it really looks like you are using a desktop application!  Along the top, you have a button to enlarge, or shrink the page.  You have Undo and Redo buttons.  Next you see buttons for Text, Shape and image.  Clicking Text will drop a text box on your document.  Clicking Shape will provide you with a series of shapes you can add to your document.  Finally the image button will let you add an image to your document.  

Now Apple recently updated the Mac version of Pages.  Ideally, it look and works exactly the same as the web version.  This is great as you only have to learn how to use it one place to be able to use it anywhere!  The iOS version also has the same interface.  

On the above screen capture, on the right side, you see options for your text.  First you have paragraph style, below that Font, then Alignment, Line Space, Paragraph Spacing, List Style, then finally Indent.  All the options cleanly laid out, easy to see, and more important, easy to use!

Pages in iCloud alleviates the need to save your documents.  It simply saves as you type.  Google Docs also does this.  It's a wonderful feature that saves you the worry of wondering if you saved your doc and when it was last saved, and you can't put a price on that!

Similar to Google Docs, Pages gives you the option to Share your document.  Along the top toolbar (above), you'll see the Share button.  Press it and you'll see a window like the screen capture I'm displaying below.


Click the email button and you can email the document link to multiple people, who can in turn edit the document and save it back to your iCloud!  Nice...

Pages let's you share the document in multiple formats as well.  You can save it in either the Pages format, Word format or as a PDF.   Google Docs only lets you save as a Google Doc type.  Another win for Pages.  

The Tools button gives you a series of choices (the screen capture below).  There you have the Find & Replace option, additional settings, Help.  You can also download a copy, email or print the document, go back to all your docs, or finally Sign out.  


One other item of note for pages, it lets you upload a Word document, edit it, and even save it back to Word format.  Can't do that in Google Docs.

I really love what Apple has done with Pages in iCloud.  It's a wonderfully full featured cloud based word processor.  Like Google Docs, it's free (to those with an iCloud account).  I highly recommend trying and getting comfortable with it.  If you have an iPhone 5S or 5C or iPad Air, you can download Pages for those devices for free.  Giving you the ability to have your documents with you anywhere you go.  

In conclusion, both cloud based word processors are very very good.  They are easy to use, full featured, and give you access to your documents where ever you are (via your iOS devices).  Not to bash Microsoft (even though I thoroughly enjoy doing that!), as they also have a cloud version of Office (Microsoft 365), but guess what?  They charge you for it!  $99 dollars a year, or $9.95 a month.  Why bother when you have two great options that are free!  

I hoped you enjoyed today's blog, and I hope you try one or both of these cloud document tools out as it's the future, and it's better to be comfortable with it sooner rather than later!

Until next time, best to you and your devices.  And as always, I welcome your comments.


Monday, January 6, 2014

Camera Apps for your iPhone.

Happy New Year!  I hope you all had a safe and happy 2013 Holiday season.  To start off 2014, I wanted to introduce you to some awesome Camera apps for your iPhone.  Now you may be thinking, why on earth would I need additional camera Apps, when my phone comes with a Camera app, right?  Well yes, your iPhone does come with a nice, basic Camera App, but how would you like to add some super cool camera features, and make your iPhone an even better camera?  I've got just the Apps to help you out!  My favorite feature of all these apps, is ease of use!  When I'm out and about taking photos, the last thing I want in a camera app (or any app for that matter!), is for it to be challenging to use!  That being the case, it will get deleted from my iPhone immediately!  There are three apps I want to introduce you to with this blog:  Camera+, VSCO Cam, and Pix.  They are all great apps, I recommend you download all three and see which one (or ones) you like the best.  Each has different editing features, and different sharing options, so go to the app store, download them and let your 2014 picture taking, photo editing fun begin!  These are hardly the only three camera apps available, and they aren't the only camera apps I use, but they are three great ones

If I had to pick a favorite camera App it would be  Camera+.  It's got some wonderful options, it has been around for a few years now, and is currently on version 5, and my favorite, the App costs all of .99 cents!  Seriously, I would buy this app for $10 it's so good, so for .99 cents this is a complete no brainer!

Using Camera + is super easy, and can make a novice photographer look like a seasoned pro!  Some of it's awesome features include:  Touch Exposure and Focus - Simply tapping on the screen allows you to set the exposure separately from the focus (very cool!), allowing you to control how light or dark your picture comes out!  Nice...:).

Shooting Modes - There  are five different modes you can shoot with, Square, which let's you take pictures to better use on various Social sites.  Normal mode.  You can use the Stabilizer feature of the app to steady your iPhone and get the best possible picture.  Theres a Timer feature that will help you get the best selfies possible...Burst mode which will allow you to take pictures is rapid succession.


 Digital Zoom - The Apps zoom gives you up to 6X (notice the bar on the right side of the screen capture below, at 6X) the zoom with advanced digital processing that gives you awesome photos!


Front Flash - How about this cool feature?  Ever wish your iPhone had an available front flash?  Well with Camera + it now does!  Horizon Level - to assist you in taking the most level photo possible.  You'll notice on the screen capture above, the white bar in the middle, that's your Horizon Level.  Clarity - This awesome feature shown below and available through Lightbox, analyzes your photo, makes several intelligent digital adjustments that magically bring out the best in your photos!  That is awesome!


Effects - Camera + comes with some incredible effects to enhance your pictures.  Theres Scenes, which let's you add Flash, Backlit, Darken, Cloudy, to name just a few (have a look again at the above screen cap, it's also in Scene mode).  Then there's Crops, which let's you crop to Square mode, 3x2, 4x3, 4x6 etc etc etc.


The Lab where you can add Clarity, Rotate, Straighten, and Tint and Duotone to name a few.


Filters where can add awesome filters like Retro, Special, I Heart Analog and Hollywood.


Finally Frames, where you can add some killer frames to your already killer photographs...


The next feature I'm going to cover in Camera + is Lightbox  - Lightbox is a unique way to sort through your photos, delete the ones you don't want, and save your fav's to your iPhone's Photo App.  Camera + has some other great features.


You can share your photos to your favorite Social networks, it even syncs with iCloud so you can take pics all day with your iPhone, and edit on your iPad (there's an iPad app as well).


So these are some of the great features that come with Camera +.  There are also 2 in-app purchases available (both at the low, low price of .99 Cents as well).  Not only do I highly recommend Camera+, and I use it very often to take pics with my 5S...:).

The next App up for review is VSCO Cam, from Visual Supply Company.  VSCO Cam is right on par with Camera + for awesome iPhone camera apps.  Not only does it have a ton of great features, but it's also super easy to use, and makes it easy to share with your favorite social sites as well.   It let's you edit basic elements like temperature, cropping, contrast, exposure and rotating natively.  You can also easily apply a any of the fantastic filters.  Now this is my only gripe with VSCO Cam, it has too many in-app purchases, some that cost $5.99, others costing only .99 cents.  That said, it's still a fantastic way to take and edit pictures with your iPhone.  One of my favorite features in this app, is VSCO Grid.  The Grid is a publishing platform for your photos, to showcase your pictures to everyone that uses the VSCO Cam app.  It also allows you to discover other great photographers that are using the VSCO app, which could be another fun and interesting way to connect online.  


Increased Control - As in the Camera + app, VSCO also has Separate Focus and Exposure rings to give you better control of your photos. When you are in camera mode, simply tap the screen to activate these features (the red circle on the screen capture below).


Editing - Once you've taken your photos, VSCO allows you to easily edit them.  In the first screen capture below, at the bottom, from left to right, the icons are Exposure, Temperature, Contrast, Rotate and Crop.  Simply tap on the desired effect, and you'll quickly and easily be able to change the look and feel of of your photos!  The subsequent screen caps show additional editing options.


Before and After - If you're not sure you want to keep the edit you've added, you can easily compare your edited photo with the original by simply pressing down on the edited image while in Edit view.  Library - Each picture you take saves into the VSCO Library and can also be moved into the iPhone's photo App library.  


You can also share to various social sites like Instagram, Facebook, Twitter, Weibo, or you can email the photo to anyone you choose!


As you can see, VSCO is a great tool, similar to Camera +, but with it's own unique characteristics.  I highly recommend this app for your photos as well!

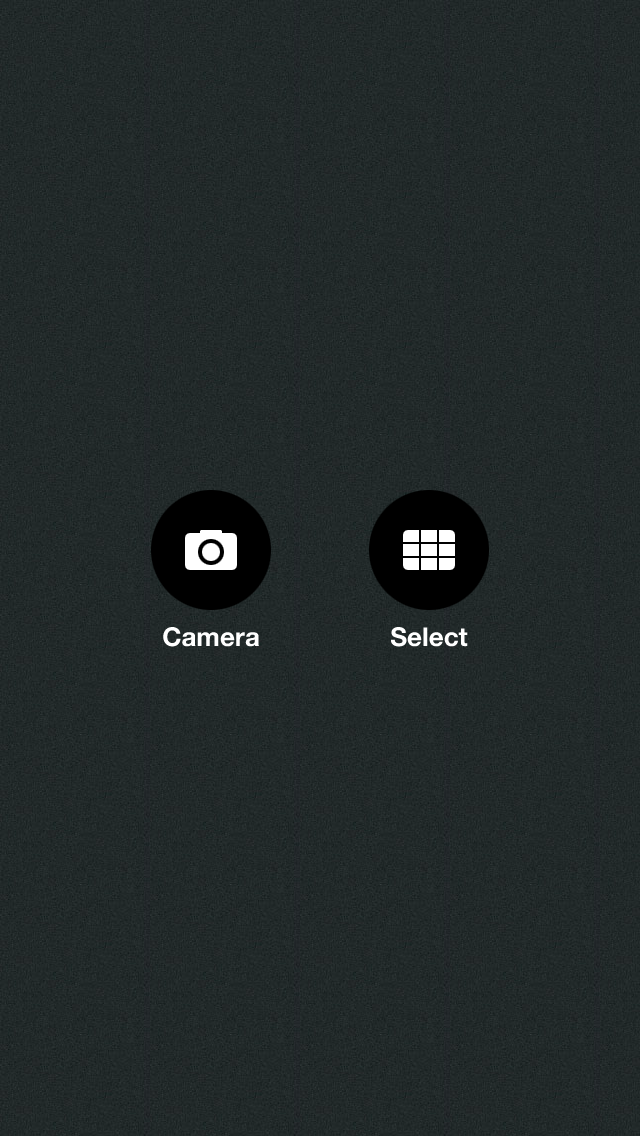
The last camera app I'm going to review today is Pix.  I'm relatively new to Pix, but I love it!  It's got a very easy to use interface.  As you can see by the screen capture below, you have two options when you enter the app, Camera or Select from existing pictures.


We'll start with the Camera.  The camera itself is basic, with less features than either Camera+, VSCO, or the Camera app that comes with the phone.  There's no grid, no HDR option, no setting the focus or exposure.


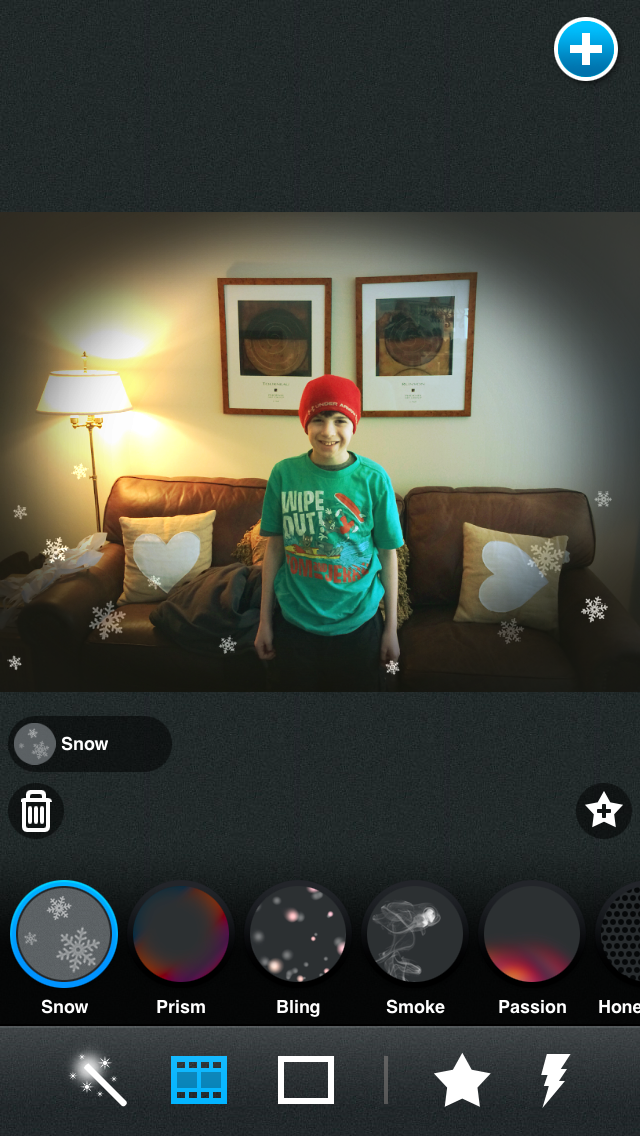
The fun begins once you've either taken the picture, or chosen a picture to edit from you iPhone or iPad library.  Now, you've got hundreds of editing enhancements, and you can use multiple enhancements per picture.  The first screen capture you see below is a picture from my library with no enhancements.  


The first set of enhancements, the left most icon (blue wand) gives you over 30 different various enhancements that can be used alone, or  together.  Simply tap the enhancements you'd like to use, on the next screen capture below I've chosen the Cartoon 3 and Toaster enhancement options.  Pix allows you to have three enhancements at a time from the Blue Wand icon.  Pick the ones you like, then you can save that new picture, or share it.  Now if you don't like the enhancements you've chosen, simply tap the enhancement and it will go into the garbage and be removed from that picture


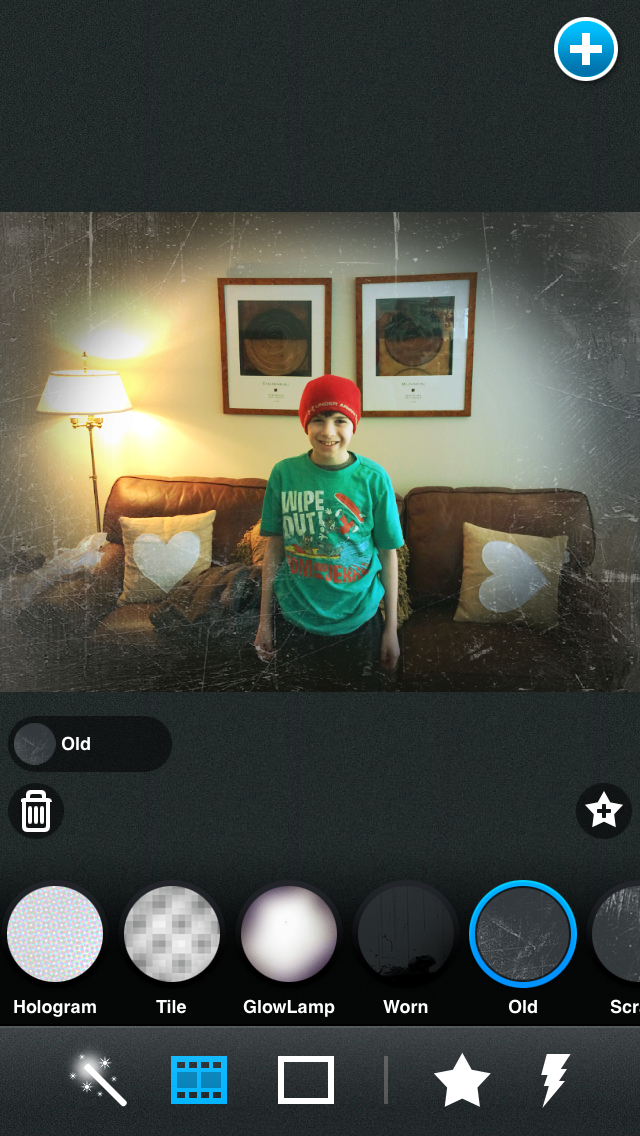
The 2nd icon from the left, sort of looks like a film strip, gives you additional fun enhancements for your playing pleasure.  These enhancements can not be used together, only one at a time however.   Everything from adding snowflakes to your picture to adding cool Smoke, to making your picture look old fashion using the Old enhancement.


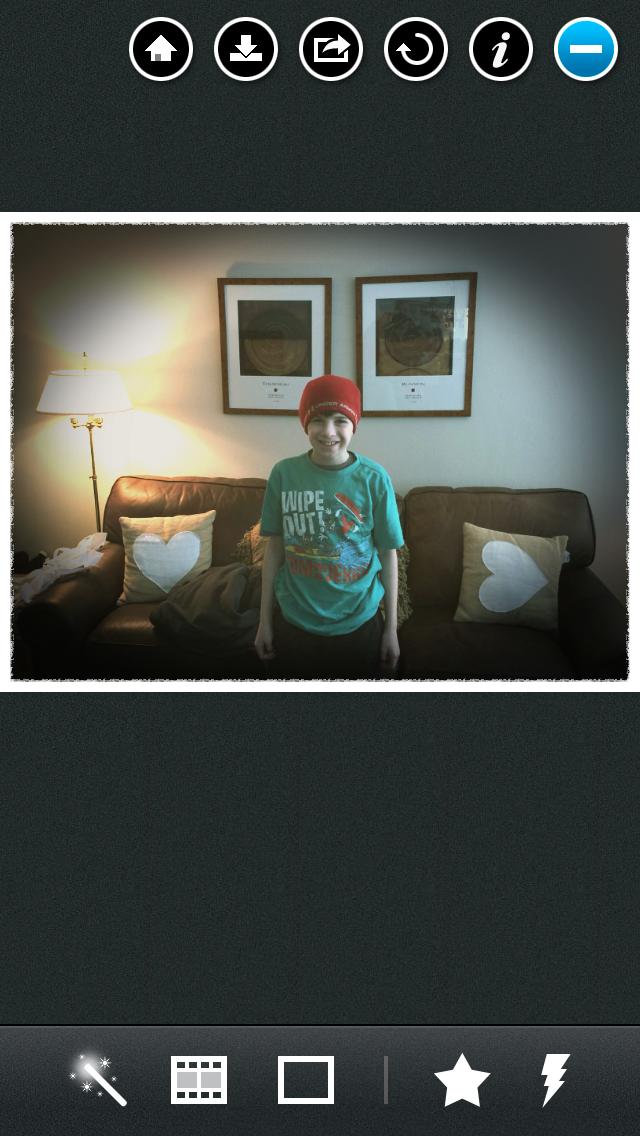
The next set of enhancements, the Square icon, is for framing your picture.  There are 20 plus frames you can choose from, from a Christmas frame, to a Corkboard frame (on the screen capture below), to a WhiteEdge frame.  To pick the frame you want, simply tap it.


The Star icon lets you save the enhancements you've just created as favorites to use again with other pictures, a feature I truly like.

The last icon, the lightning bolt is super cool as well.  When you tap it, it randomly picks the enhancements for the photo.

The last icon to discuss is the blue + icon, at the top right of your screen.  When you tap it, five other icons appear.


The first icon, (in the first screen capture below) Home, takes you either back to the camera, or lets you select from other pictures in your library.  The 2nd icon, the down arrow, let's you save your picture either in the original size, or Optimized size.  The third icon (2nd screen cap), is your sharing icon.  This allows you to open the picture in other Apps from your iPhone, or if you've got a 5 or 5S, you can AirDrop the picture to another device that has AirDrop capability.


The next icon the reverse arrow,  lets you undo any changes that you've made.


The last icon, the i lets you report any errors back to Pix, so they can fix!


So as you can see, Pix, like VSCO and Camera+ is a very cool, very useful camera enhancment app.  It may not have quite as many features as VSCO or Camera+, but it certainly does have some great ones, and oh yeah, did I mention that Pix is free!  That right there is an awesome feature!

So go out and download these cool apps, use them, have fun with your pics and let me know your thoughts on them.  If you've got other camera Apps that you use, let me know what you like and why.

Until next time, best to you and your devices, especially your camera!